
Having professionally produced product images throughout your shop is an important part of your product page design, as quality images quickly tell the customer a lot about the product. Poor product imagery can change the customers opinion of the quality of the product and also of your shop.
This is easily achieved by spending a little time on your images before placing them in your product pages.
Preparing Product Images for a WooCommerce Shop
CONTENTS
Image Preparation
Optimise Your Own Product Images
Photoshop
Pixlr
Paint.net
PicResize
Image Preparation
There are basically two ways to display a product image. (1) An image of the product showing it in great detail with no distractions. (2) An image of the product showing the product in situ, such as a pleasant image of the product in use. It is a good idea to show a few images of the product in detail from a few different angles, if needed, along with one or two images of it demonstrating it’s use, or an example of how to use it. Use only if it benefits the customer to show this. It depends on the product.
Images for product insertion should be square and as of now, at least 1000 pixels by 1000 pixels and at least 72 dots per inch. This will give the product a decent enlargement when viewed in the magnified image product box. It will also be quick to load on your page.
By being consistent in image size, you will also make your product thumbnails look much better as they will line up in your category pages correctly.
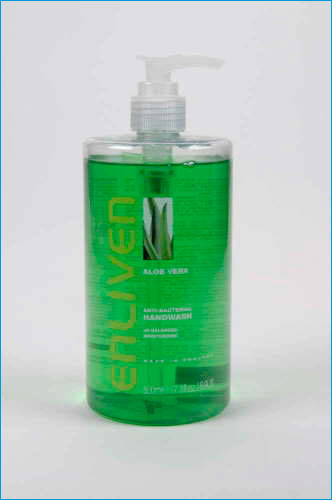
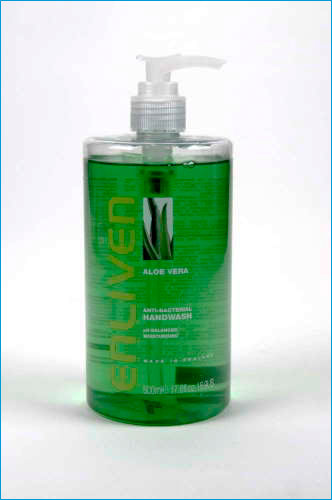
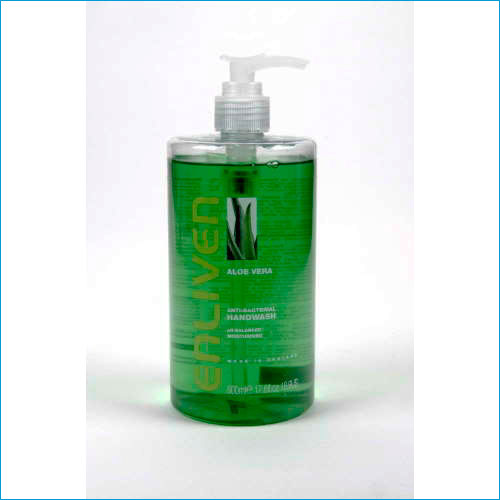
We also recommend having a pure white background when possible. This gives the product pages a nice clean look with no distractions. And if used consistently will give your shop the professional edge that you are after.
Amazon and eBay shops also require this image size for their online shops. If you are thinking of branching out and increasing sales by adding these shops to your portfolio, you will already have the product images readily on hand to use there.

I have given this image an edge stroke (in blue) so
that you can see the square shape of the total image.
Also, when you have finished editing your product image, re-name your image file for with a descriptive file name. Instead of “_dsc5481.jpg” for instance, use “safe-hand-sanitiser.jpg” and do not forget to add a sentence description in the Alt Tag when you upload the image into your WordPress Media Gallery. In this case, we would add “Bartons Safe Hands Sanitiser 5 litres, a quick acting, no rinse, alcohol hand rub for Coronavirus.” Descriptive file names and Alt Tags will boost your SEO and every little helps!
The easiest method of optimising your product images is to use the manufacturer’s images. Chances are they have already done all the hard work, and if you are selling their products and have an account with them, they are usually happy for you to use their images. They will have a location on the internet that you can access and download all the images that you need. The only negative thing I have about this is that sometimes their images can be old and therefore small in size if they were made when the internet was a lot slower and images that were 500 pixels X 500 pixels were considered very large for the internet download speeds (read page loading speeds). Or, sometimes they have huge images as their new “webmaster” did not bother to optimise the newer images and you end up with 5,000 X 4,000 pixel images mixed in. But, you can still optimise these images for your own WooCommerce shop.
Sometimes you have no choice but to take your own images. See our Product Photography Guide.
A word of caution about images – only use images from the internet that you have paid for, bought from stock agencies, downloaded from copyright-free stock agencies, received permission to use from the owner (such as a manufacturer), or taken yourself.
Google makes it all too easy to do a search and find the perfect image and a single right click and a left click and you have it. The problem is that stock agencies like Getty Images can find every instance of their images being used on the internet, and if you did not purchase it from them, look out! You can try this yourself with any image using a service like TinEye Reverse Image Search. You will be amazed!
How to Optimise Your Own Product Images
You will need a photo editor. There are lots of photo editors available and the leading one is Photoshop. This can be expensive (or Adobe Elements that is far cheaper). There is a great Free Online Photo Editor – PIXLR that has a lot of features like Photoshop, and is all you will need to edit and optimise you product images. There are other free alternatives, either programs that you download and install into your computer like Paint.net (Microsoft shop sells it for £5 or click on the blue link for the same copy for free), or just optimise your product image online using your browser like Pic-Resize. There is even a plugin for WordPress called WP-Smushit that will optimise your images from within WordPress after you have uploaded them to your Media Gallery.
If you are fortunate to have a copy or a online license for Photoshop (or Adobe Elements) or use Pixlr, or Paint.net, and know how to use the basics, you are well on your way to quickly achieving the image quality you need.
Photoshop
If the image is in Portrait Mode (vertical) the side with the maximum length would be the height. If the image was shot in Landscape Mode (horizontal), then the side with the maximum length would be the width. Open the image in Photoshop and resize the image so that the longest side is now 1000 pixels.
Image – Image Size – (Width or Height) 1000 pixels – OK
In the example to the right the image is a vertical or a “Portrait” image the height is now set to 1000 pixels, leaving the width at whatever size your image ratio from your camera happens to be. In my case the width is 728 pixels.
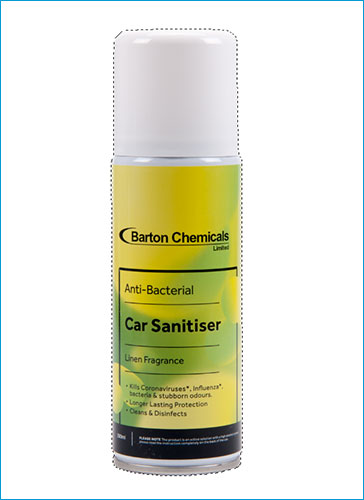
Knock-Out The Product Image
Now we have to knock out the product image. If the product here had a black plastic cap, then I would use Photoshop’s Magic Wand (32 tolerance) and give the light grey a few clicks (using the shift key – to add to the selection) until all the background was selected. As there would be enough contrast and colour difference between the product and the background. Then, using the Photoshop – Select – Inverse, would result in a perfectly selected product
Original Image (1) as photographed. Light grey background, slight shadow. Height reduced to 1000 pixels which makes the width X 728 pixels.
Manual Knock-Out
But, typically the product here has a white plastic cap and the easy method of the magic wand will not work as there is not enough contrast and colour difference between the light grey background and the white cap. So, the other method of having to carefully manually select and cut out the product from the background is employed. Enlarge the view of the image – magnifying glass – shift + left click, and increase the view so that it is now easy to work on. Select the Polygonal Lasso tool – third one down and click and hold until the three tools display and choose the second one – the Polygonal Lasso tool. Click on the edge of the product and start moving your cursor around the product image, clicking every now and again while you go especially if there is a change of direction – the straight parts are easy, but watch the round corners. Best to go in little movements here and lots of clicks. Until you have completely gone around the product and back to your starting position. When you are on top of your original click the cursor will show a little circle. Click here, and you should have a complete selection of the product.
Image (2) showing the product cutout and a new layer of pure white behind it. Height still 1000 pixels X 728 pixels Wide.
Add a New White Background
Now that you have the product selected (as in Image 2), click copy (Control + “C”) and paste (Control + “V”), and Photoshop will add a new layer to your image and paste the product only with no background. You will not see any change as the original image will still be underneath in the Background layer. If you have the Layers pallet displaying, click on the little eye beside the background layer it will turn off its visibility, and you will see the background disappear. Click on the background layer and then click the folded sheet in the bottom of the Layers pallet (adding a new layer on top of the background layer), and a new blank layer will appear. In your layers pallet, click on this layer and go to your Paint Bucket Tool (12 down) making sure your Foreground colour is 100% white. if it is not, click on the top little square of colour and the colour picker will appear. Move your cursor into the colour area click and drag the cursor to the very top left and even go out of the colour area (RGB should be 255 each, and the hex code should read #ffffff), click ok to the colour picker and click on your paint bucket and while the new layer is selected click anywhere in your image and the new layer will turn all white (as in Image 2). Make sure this new white layer is below your new product image layer, otherwise your image will disappear. if the white layer is above the product layer. To correct this, simply click and drag it below the product area in the layers pallet (rearrange the order of the layers).
Finished image (3) now with a canvas size of 1000 pixels X 1000 pixels (square).
Make the Image Square
Next, let’s make the image square. With the magnifying glass + the alt key reduce the image view until it is 100%. Click on Photoshop – Image – Canvas Size, and the Canvas size dialogue box will appear. In our case the height is 1000 pixels and we want to make the width the same. So with the Anchor in the middle – no need to touch it (the area with the arrows), highlight the Width box and type in 1000. Make sure the canvas colour extension is “White” and click OK.
Save your file by clicking on Photoshop – File – Save As, and renaming the image file something like – “car-sanitiser” and save it to a folder for all your files (e.g., Product Files). Now you have a detailed image of your product.
Important
You can now optimise your image for your website shop by reducing the file size (in megabytes) but preserving how the image looks as you see it now. Before you close your image, click on Photoshop – File – Save for Web and the dialogue box will open. With the preset on JPEG High (quality 60%), click save at the bottom, and save the image in another folder called “Web” in your computer. This will typically reduce the file size to one third the original and make it perfect for your website. Still looking good at 1000 pixels X 1000 pixels.
Congratulations you have completed your first product image – just like a pro!
Pixlr
Pixlr is an online photo editor much like Photoshop. Click Pixlr to go to the website and open a free account.
Upload Your Image
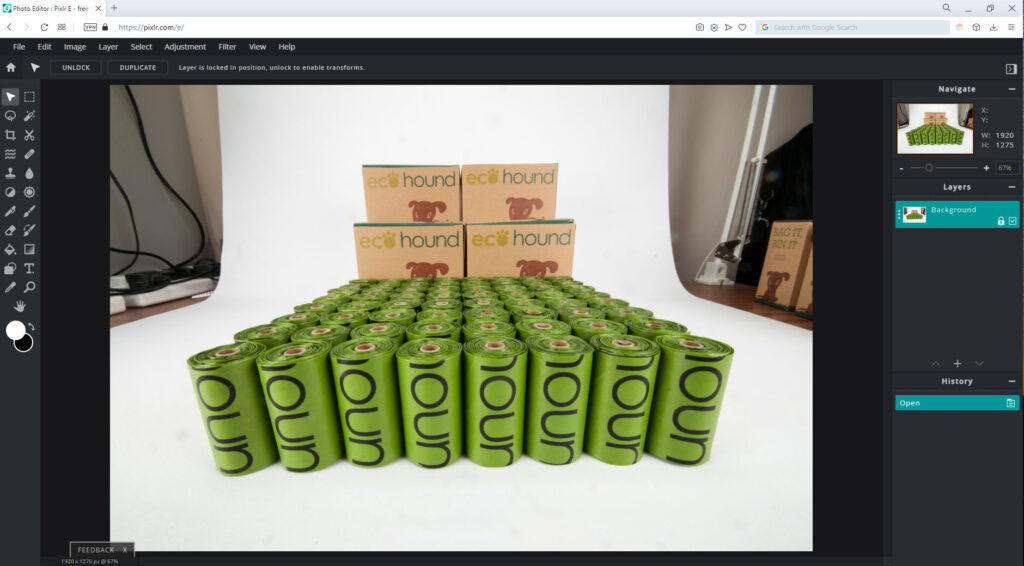
If your image is too large (around 4000 pxls) to do the editing over the internet, Pixlr will ask to reduce it to a smaller size. Remember we are going to end up with a 1000 pxls X 1000 pxls image so a medium size is fine. The size I chose was 1900 pxls. You can see the original product was fairly large and I had to include areas that were beyond the white “infinity” background sheet. but we can take care of this easily.
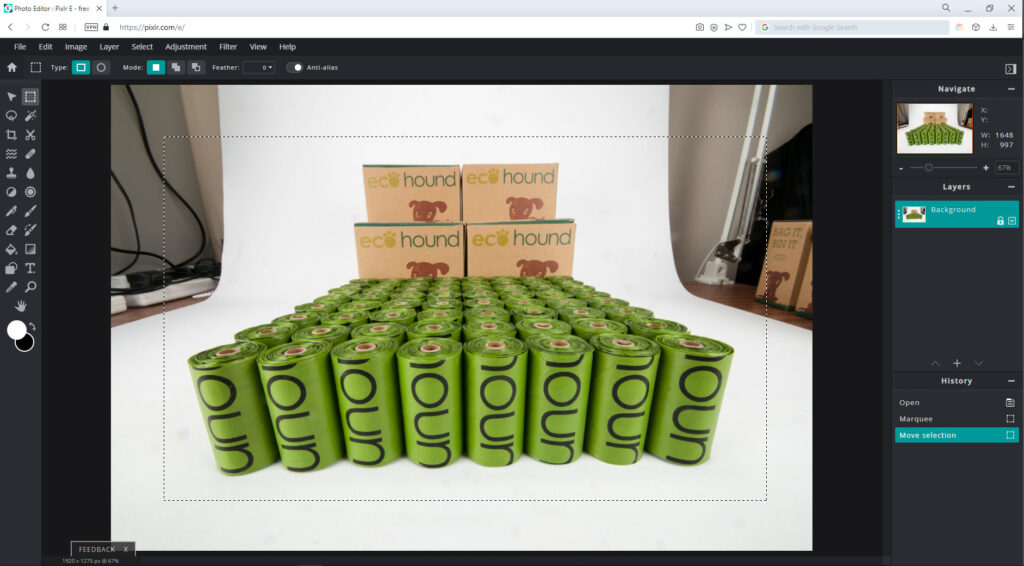
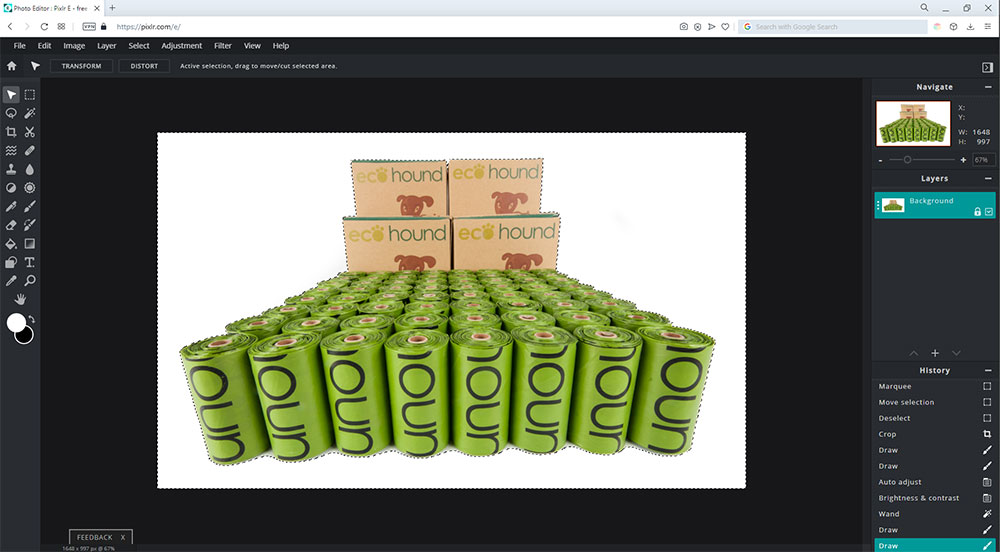
Crop Your Image
We would want to crop this horizontal image down a little so we have less work to do. I clicked on the Marque Selection tool (top right) and selected an area just around the product. You can see the dots marking this area.
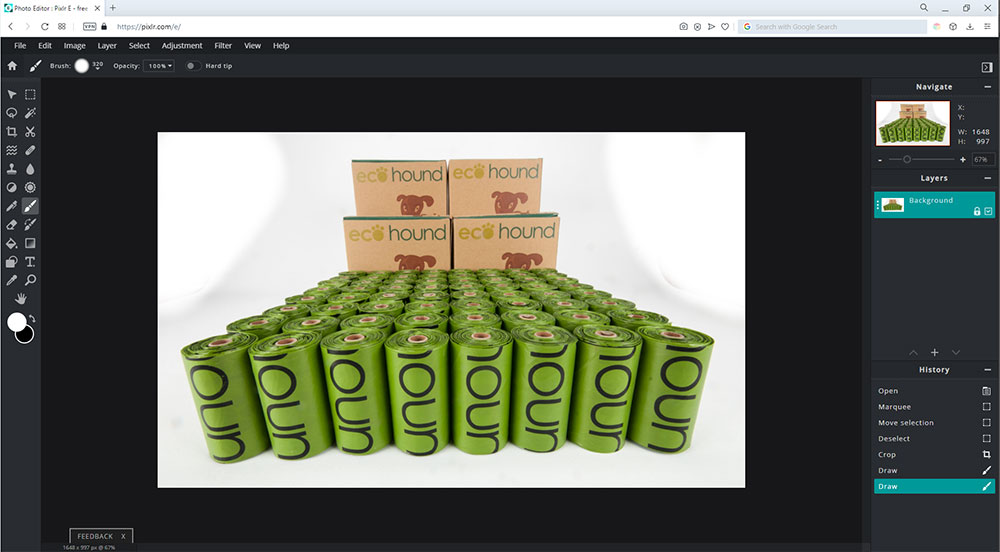
Edit Your Background
After you have your selection click on Image – Crop, and the cropping will take place. I then took the brush tool (seven down on the right) and making sure the colour palette was pure white (the two circles on the middle left – the one on top is the primary colour). I roughly painted in the studio edges.
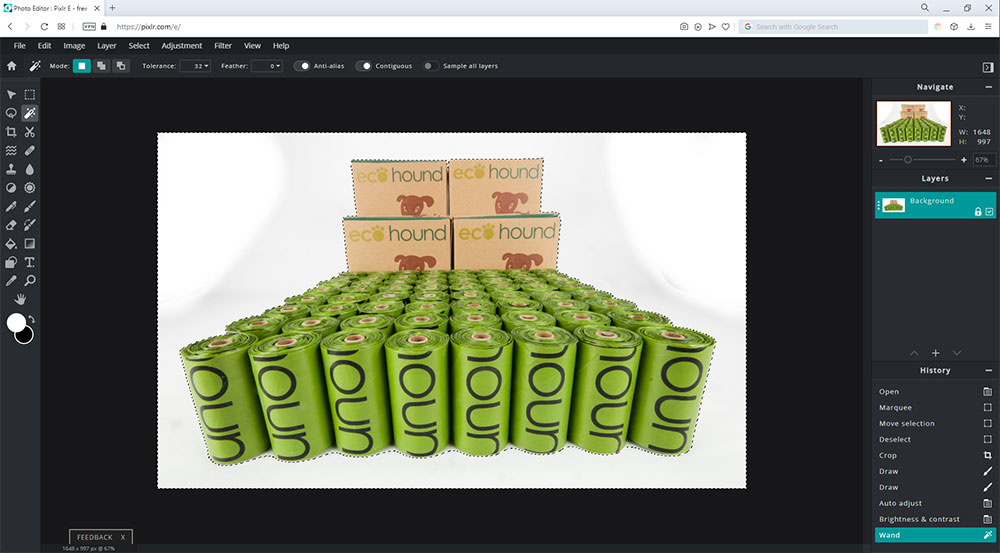
Select Your Entire Background
Now that the background was a combination of pure white and slightly grey, which is now close enough in contrast and colour to use the Wand Select tool (two down on the right of the Tool Pallet), With the tolerance setting at 32, I clicked on a white area on the left of the background of the image. The selection was now made and if you look closely you can see the dots all around the product.
Make the Background White
With the background now completely selected, you can either use the paint brush or the Fill Tool (nine down on the left of the Tool Palette), whichever one you feel comfortable in using. Either paint the entire background with a brush set to about 320 in size or the Fill Tool. The selection area will stop either brush or fill from affecting the product area. The image below shows the background is now completely white.
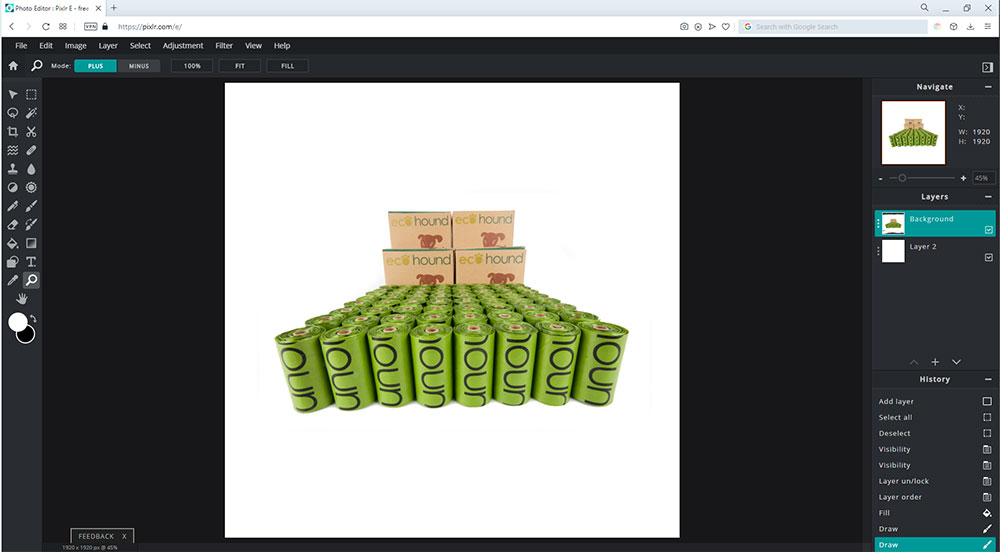
Square Your Image
Now it is time to make the image (canvas) square. I selected the Image – Canvas pallet and left the anchor in the middle position and changed the size of the canvas to both height and width to be the same. Whichever one is the biggest – in this case it is the width, then I changed the height to the same number of pixels (1920) and clicked apply. I then added added a new layer (layer 2) by clicking on the Layer – New Layer. And in the Layers Pallet I double clicked the background lock to unlock it and rearranged the order of the layers by clicking on the layer 2 and dragging it below the background layer. while the layer 2 was selected I took the Fill tool and filled in the layer 2 with pure white. I then clicked on the Layer – Merge Down – button, so the layers became just one layer.
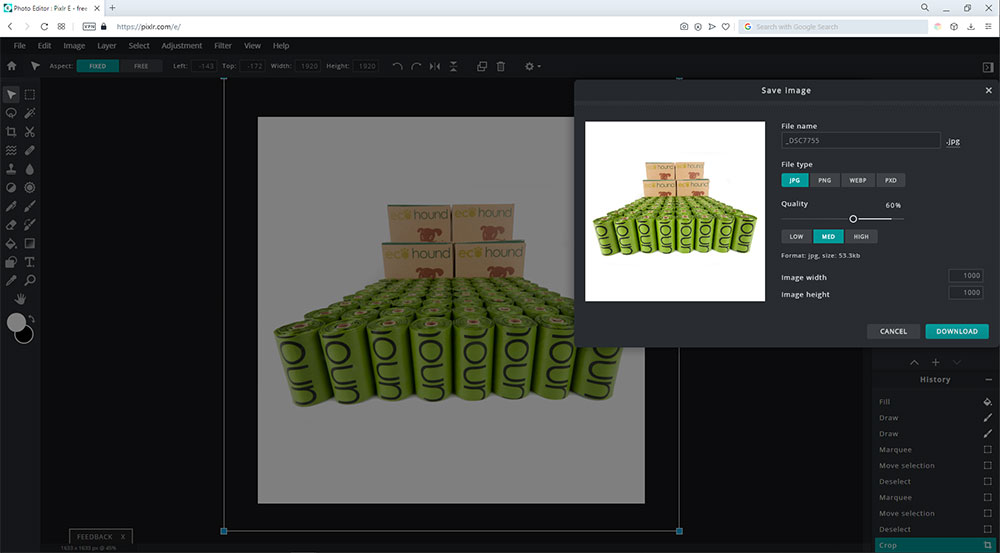
Download Your File
Now that the image is finished, the product is nicely situated in the image, the background is pure white, and the image is square. It was time to download the image to my computer. By clicking on File – Save – and the Save dialogue box appears. You should re-name the file to something descriptive other than its original file name to help with your SEO – ecohound-dog-poo-bags.jpg, select .jpg as the file type, Quality – medium around 60%, and change the image width and image height to 1000 pixels, and click Download. Select a folder on your computer to receive the image file and you are all done.
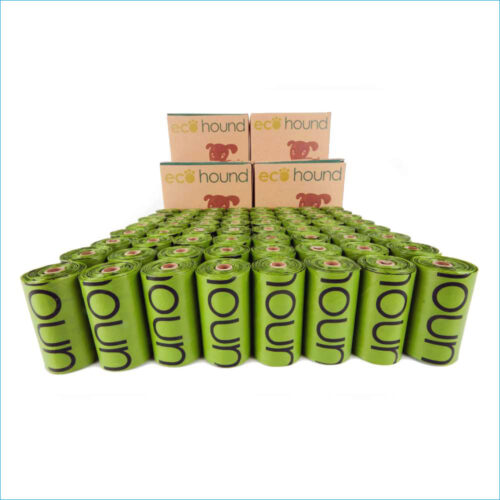
The finished product image ready to upload to your WooCommerce shop!
Paint.net
Resize Your Image
Start Paint.net and open your image.
Again, if the image is in Portrait Mode (vertical), the side with the maximum length would be the height. If the image was shot in Landscape Mode (horizontal), then the side with the maximum length would be the width. Open the image in Paint.net and resize the image so that the longest side is now 1000 pixels.
Image – Image Resize – First set you Resolution PPI (pixels per inch) to 72 ppi, then set the longest side (Width or Height) to 1000 pixels – click OK.
In the example to the right, the image is a vertical or a “Portrait” image the height is now set to 1000 pixels, leaving the width at whatever size your image ratio from your camera happens to be. In this case the width is now 664 pixels.
Original image against a white background which is showing up as grey.
Brightness and Contrast
Adjust the brightness and contrast (Adjustments – Brightness / Contrast) until the background is as white as possible, but make it but still have the detail in your product. Adjust the brightness first and then bring the product back with an increase in contrast adjustment. Do not be afraid to have a play with these adjustments as you can always undo anything in your history pallet (or Control + x on your keyboard).
Adjusting the brightness and contrast will help lighten the background
Make Your Image Size (or Canvas) Square
First, make sure your white colour (Primary) box is now the background colour. In the Colour Pallet there is the 2 “colours” black and white and beside them is the bent double arrow, click on this double bent arrow to swap the white to the background (or hit the “x” key on your keyboard).
Now adjust your canvas size (Image – Canvas size) so that the image is now square. Change the width or height to match the other dimension. In my case, I would change the 664 to 1000, By Absolute size and leave the anchor in the middle – click OK.
If your new added side wings are pure white and your background of the image is slightly off-white or grey, you can soften this difference by selecting the Paint Brush (six down on the left in the Tools Pallet), adjusting the brush width to say 200 and the hardness to “0”. remember to return the white (your primary colour) to the top in your colour pallet (click on the double bent arrows or “x” on your keyboard). Carefully staying away from your product sweep the areas that are causing any concern with the paintbrush. You can see how closely you can approach the product without changing it. If you go too close and it is changed, then simply undo the last action (go back one stage in your history pallet, or “Control + x” on your keyboard) and try again. If you need to go closer to your product, then reduce the size of your brush to say 60, and this will allow you to go closer.
Making your image square
Save Your Image
Save your image – File – Save As – as a .jpg and at 60% sample rate. This will now be optimised for your website shop.
Paint.net is not as sophisticated or complex as Photoshop, and perhaps this is a plus. But the fact that it is free (optional small donation) means it is more available to use, and the results are still pretty good.
A little retouching with the paint brush can make your background nice and white.

![]()
Once you have processed your image, or you have a great product photo that just needs to be resized and optimised. You can do this online using your favourite browser. Just go to PicResize.
Their free online tool allows you to do a single image or batch file up to 100 pictures. They allow you to Crop, Rotate, or Flip your image before deciding how much to optimise the image.
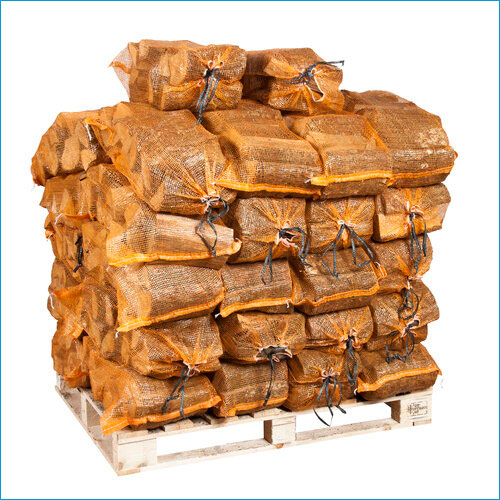
In my case I took a 4,000 pxls X 4000 pxls product image and reduced it to 500 pxls x 500 pxls, as a .JPG at “Better Quality” (other options include Good and Best, and for a product image, I would normally save it as 1000 pxls X 1000 pxls). Which took the image from a whopping 9.370 MB down to a skimpy 112 KB before saving it to my computer. This is the optimised image you can see on the right (the pallet of wood logs).
Their Pro Version allows you to also enlarge photos (max – double) using AI, as well as adding text to your image, unlimited images, and all ad-free for $30/year.
Feel free to contact us or visit our commercial photography services website.